Resin is a versatile material that is commonly used in various crafts and projects. However, one common issue that many resin enthusiasts face is the formation of pits on the resin surface. These pits can detract from the overall appearance of your resin piece, but don’t worry, they can be easily fixed. In this step-by-step guide, we will walk you through the process of fixing pits in resin, ensuring that your finished piece looks flawless.
Understanding the Basics of Resin
Before we delve into the process of fixing pits in resin, it is important to have a basic understanding of what resin is. Resin is a type of plastic material that is liquid in form when mixed but hardens when exposed to heat or UV light. This unique characteristic allows resin to be molded into various shapes and used for different purposes.
Resin is a versatile material that has gained popularity in various industries, including art, jewelry making, and construction. Its ability to be transparent, durable, and resistant to moisture and chemicals makes it an ideal choice for many applications.
Resin is composed of two main components: a resin and a hardener. The resin acts as the base material, providing the desired properties such as flexibility or rigidity, while the hardener initiates a chemical reaction that causes the resin to harden and solidify.
What is Resin?
Resin is a polymer compound that consists of two main components: a resin and a hardener. When these components are mixed together, a chemical reaction occurs, resulting in the formation of a solid and durable material.
The chemical reaction that takes place during the curing process of resin is known as polymerization. It involves the cross-linking of polymer chains, which leads to the formation of a three-dimensional network structure. This network structure gives resin its strength and stability.
There are various types of resin available, each with its own unique properties and applications. Some common types of resin include epoxy resin, polyester resin, and polyurethane resin. Each type of resin has its own curing time, working temperature, and specific uses.
Common Issues with Resin
While resin is a popular material for craft enthusiasts, it is not without its challenges. Pits, for example, are a common issue that can occur during the resin curing process. Pits are small depressions or holes that form on the resin surface, creating an uneven and blemished appearance.
The formation of pits in resin can be caused by various factors, including improper mixing of the resin and hardener, inadequate surface preparation, or the presence of air bubbles in the mixture. These factors can result in an uneven distribution of the resin, leading to the formation of pits as the resin cures and solidifies.
Fortunately, there are several techniques that can be used to fix pits in resin. One method involves sanding down the affected area and applying a new layer of resin to fill in the pits. Another approach is to use a heat gun or torch to carefully heat the surface of the resin, causing it to become more fluid and self-leveling, thereby minimizing the appearance of pits.
Prevention is key when it comes to avoiding pits in resin. Properly measuring and mixing the resin and hardener, ensuring a clean and dust-free work environment, and using a degassing chamber or vacuum pump to remove air bubbles from the mixture can all help to minimize the occurrence of pits.
By understanding the basics of resin and being aware of common issues like pits, you can confidently work with this versatile material and create beautiful and flawless resin projects.
Identifying Pits in Resin
Before you can fix pits in resin, it is important to be able to identify them. Pits can vary in size and depth, and they may be more noticeable on glossy surfaces. Take a close look at your resin piece and inspect it for any irregularities on the surface.
When examining your resin piece, pay attention to the texture and smoothness of the surface. Pits are small imperfections that occur when air bubbles become trapped within the resin during the curing process. These trapped air bubbles create small voids or pits on the resin surface, making it appear rough and textured.
It is important to note that pits can occur in both clear and colored resin. In clear resin, pits may be more visible as they can distort the light passing through the material. In colored resin, pits may appear as small irregularities in the color distribution.
Causes of Pits in Resin
There are several factors that can contribute to the formation of pits in resin. Inadequate mixing of the resin and hardener is one common cause. When resin and hardener are not thoroughly mixed, air bubbles can become trapped within the mixture, leading to pit formation during the curing process.
Another factor that can cause pits is improper release of air bubbles. When pouring resin into a mold or onto a surface, it is important to release any trapped air bubbles by gently tapping the mold or using a heat gun to remove them. If air bubbles are not properly released, they can create pits as the resin cures.
Insufficient curing time can also contribute to the formation of pits. Resin needs sufficient time to cure and harden completely. If the curing time is cut short, the resin may not have enough time to release any trapped air bubbles, resulting in pit formation.
Additionally, environmental factors such as temperature and humidity can affect the curing process and lead to pit formation. Extreme temperatures or high humidity levels can cause the resin to cure too quickly or not cure evenly, resulting in pits on the surface.
Understanding the root cause of pit formation in resin is crucial in order to prevent future occurrences. By ensuring proper mixing, releasing air bubbles, allowing sufficient curing time, and controlling environmental factors, you can minimize the chances of pits forming in your resin projects.
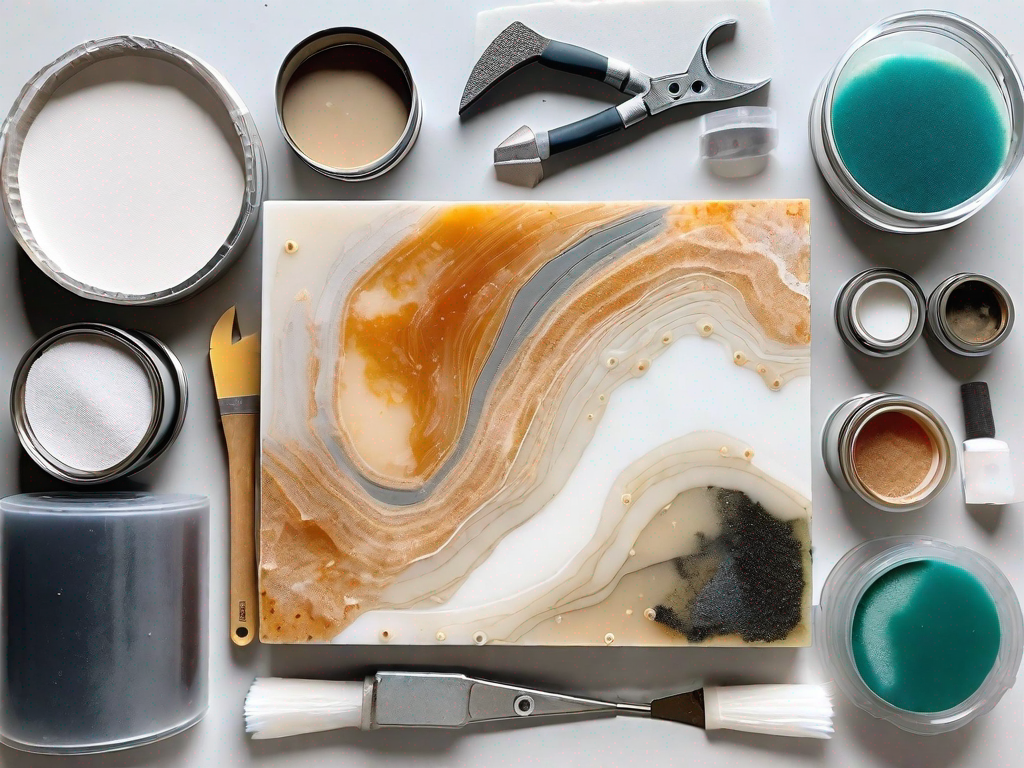
Tools Needed for Fixing Pits in Resin
Before you start fixing pits in resin, make sure you have the necessary tools and equipment. This will ensure a smooth and successful repair process.
When it comes to working with resin, having the right tools is essential. Not only will they make your job easier, but they will also help you achieve professional-looking results. So, let’s dive into the tools you’ll need for fixing pits in resin.
Safety Equipment
Safety should always be a priority when working with resin. The chemicals and fumes can be harmful if not handled properly. To protect yourself, make sure to wear the following safety equipment:
- Protective gloves: These will shield your hands from direct contact with the resin and any potential irritants.
- Safety glasses: These will protect your eyes from any splashes or accidental contact with resin particles.
- Respirator mask: This will prevent you from inhaling any harmful fumes or dust particles released during the repair process.
By wearing the appropriate safety equipment, you can minimize the risks associated with working with resin and ensure your well-being throughout the project.
Repair Tools
For fixing pits in resin, you will need a few basic tools. These tools will help you prepare the surface, apply the resin, and achieve a smooth finish. Here are the essential repair tools:
- Sandpaper of various grits: To fix pits in resin, you’ll need sandpaper with different grits. Coarser grits, such as 80 or 120, will help you level the surface and remove any imperfections. Finer grits, like 220 or 400, will smooth out the repaired area and prepare it for polishing.
- Small mixing container: You’ll need a small container to mix the resin properly. Make sure it’s clean and free from any contaminants that could affect the quality of the repair.
- Silicone spatula or brush: This tool will help you apply the resin to the damaged area. A silicone spatula or brush is ideal because it won’t stick to the resin, making it easier to spread evenly.
- Polishing cloth: Once the resin has cured, you’ll need a polishing cloth to buff the repaired surface. This will give it a glossy and seamless finish, blending it seamlessly with the rest of the resin.
Having these repair tools at your disposal will make the process of fixing pits in resin more efficient and effective. Remember to choose high-quality tools to ensure the best results.
Preparing the Resin for Repair
Once you have gathered all the necessary tools, it’s time to prepare the resin for repair. This involves cleaning the resin surface and assessing the damage.
Cleaning the Resin Surface
Before you can repair the pits, it is crucial to clean the resin surface thoroughly. Use a mild soap and warm water to remove any dirt, dust, or residue that may be present. This step is essential as it ensures that the repair will adhere properly to the resin surface.
Start by filling a basin or sink with warm water and adding a small amount of mild soap. Gently agitate the water to create a soapy solution. Place the resin piece in the soapy water and use a soft cloth or sponge to wipe away any dirt or grime. Pay close attention to the pits, making sure to remove any debris that may be lodged inside.
Once you have thoroughly cleaned the resin surface, rinse it with clean water to remove any soap residue. It is important to rinse it well to prevent any leftover soap from interfering with the repair process. After rinsing, pat the resin piece dry with a clean towel or allow it to air dry completely.
Assessing the Damage
After cleaning the resin surface, closely examine the pits and determine their size and depth. This step is crucial as it will help you choose the appropriate repair method and estimate the amount of resin needed for the repair.
Take a magnifying glass and inspect the pits carefully. Note the size and depth of each pit, as well as any additional damage such as cracks or chips. This detailed assessment will allow you to determine the best course of action for repairing the resin.
If the pits are shallow and small, you may be able to use a simple resin filler to repair them. However, if the pits are deep or there are significant cracks or chips, you may need to consider a more involved repair process, such as using epoxy resin or conducting a full restoration.
By assessing the damage thoroughly, you can ensure that you choose the most appropriate repair method and have all the necessary materials ready before beginning the repair process.
Step-by-Step Guide to Fixing Pits
Once you have prepared the resin, you can begin the process of fixing the pits. Follow these step-by-step instructions for a seamless repair:
Filling the Pits
Start by filling the pits with fresh resin. Mix a small amount of resin and hardener according to the manufacturer’s instructions. Use a silicone spatula or brush to carefully apply the resin mixture to the pits, ensuring that they are completely filled. Take care not to overfill the pits, as excess resin can create additional issues.
Sanding the Resin
After the resin has fully cured, it’s time to sand the surface to achieve a smooth and even finish. Start with a coarser grit sandpaper to remove any excess resin and level the repaired pits. Gradually work your way up to finer grits until the surface is smooth and free of imperfections.
Polishing the Resin
Once you have achieved the desired smoothness, it’s time to polish the resin. Use a polishing cloth and a polishing compound specifically designed for resin to bring out its natural shine. Apply the compound to the cloth and gently polish the resin surface in circular motions. Continue polishing until the surface is glossy and flawless.
With these simple steps, you can successfully fix pits in resin and restore your resin piece to its former glory. Remember to take your time and follow the instructions carefully for the best results. Happy resin crafting!