Acrylic nails can be a great way to add length and beauty to your natural nails. However, they are not invincible and sometimes, they may fall off. If you find yourself in this situation, don’t panic! There are steps you can take to fix an acrylic nail that has come loose or fallen off completely.
Understanding Why Acrylic Nails Fall Off
Before we dive into the steps for fixing a fallen acrylic nail, it’s important to understand why this happens in the first place. There are a few common causes of acrylic nail damage that can lead to them falling off.
Firstly, improper nail preparation can weaken the bond between the acrylic and your natural nail. If the natural nail hasn’t been thoroughly cleaned, buffed, and primed before application, the adhesive may not adhere properly, resulting in a loose or detached nail.
Secondly, rough treatment or trauma to the nails can also cause acrylic nails to fall off. This can include activities like excessive typing, using your nails as tools, or even accidentally snagging them on something.
However, it’s not just external factors that can lead to acrylic nail damage. The health of your natural nails also plays a significant role. Brittle, weak, or damaged natural nails are more prone to experiencing acrylic nail detachment. Therefore, it’s crucial to maintain the health of your natural nails through proper care and maintenance.
Common Causes of Acrylic Nail Damage
Here are a few common causes of acrylic nail damage:
- Poor nail preparation: As mentioned earlier, inadequate nail preparation can weaken the bond between the acrylic and your natural nail, making it more likely for the acrylic nail to fall off.
- Excessive pressure or trauma: Applying excessive pressure on your nails, whether it’s from typing vigorously on a keyboard or engaging in activities that put strain on your nails, can cause the acrylic nails to loosen and eventually fall off.
- Using nails as tools: Using your acrylic nails as tools, such as opening cans or scratching surfaces, can lead to damage and detachment.
- Chemicals or harsh products: Exposure to certain chemicals or harsh products, such as strong cleaning agents or acetone-based nail polish removers, can weaken the bond between the acrylic and your natural nail, increasing the risk of acrylic nail detachment.
The Role of Proper Nail Care
Taking care of your natural nails is essential for maintaining the longevity of your acrylic nails. Keeping your nails clean, moisturizing your cuticles, and avoiding harsh chemicals are all important steps in preventing damage and prolonging the lifespan of your acrylic nails.
Regularly moisturizing your cuticles helps to keep them hydrated and prevents them from becoming dry and brittle, which can contribute to acrylic nail damage. Additionally, avoiding excessive exposure to water, as prolonged moisture can weaken the bond between the acrylic and your natural nail.
Furthermore, it’s crucial to ensure that you are not applying excessive pressure on your nails during daily activities. Remember, acrylic nails are an extension of your natural nails, and they require proper care and maintenance to stay intact.
Incorporating a nail strengthening treatment into your nail care routine can also help improve the health and resilience of your natural nails, reducing the risk of acrylic nail detachment. These treatments often contain ingredients like keratin and vitamins that promote nail growth and strength.
Lastly, regular visits to a professional nail technician for maintenance and touch-ups are essential. They can assess the condition of your acrylic nails, make any necessary repairs, and provide guidance on proper care techniques.
Gathering the Necessary Tools and Materials
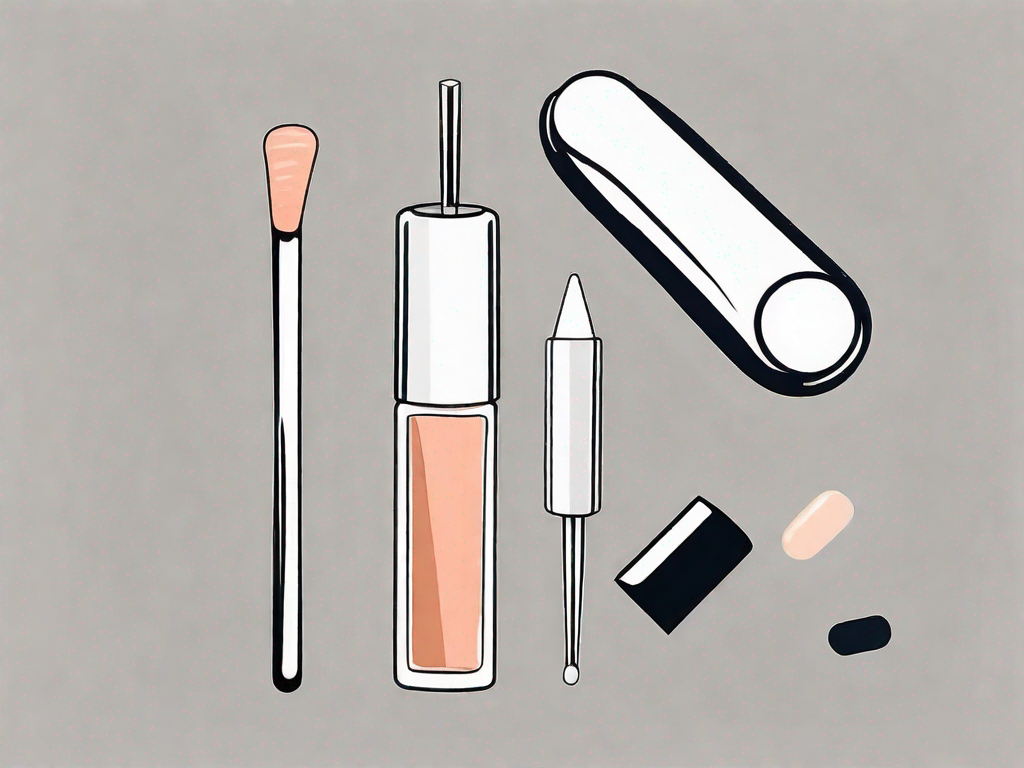
Before you attempt to fix your fallen acrylic nail, it’s important to gather all the necessary tools and materials. By being prepared, you’ll make the repair process much smoother and easier.
Fixing a fallen acrylic nail is a common problem that many people encounter. Whether it’s due to a snag, accidental bump, or simply wear and tear, having the right tools and materials on hand is essential to restore your nail to its former glory.
Essential Items for Acrylic Nail Repair
Here are the essential items you’ll need to fix your fallen acrylic nail:
- Nail glue or adhesive
- Cuticle oil or moisturizer
- Nail file or buffer
- Cotton swabs or a small brush
- Acetone or nail polish remover
- Lint-free wipes or paper towels
Each of these items plays a crucial role in the repair process. Nail glue or adhesive is the key component that will hold your fallen acrylic nail in place. Cuticle oil or moisturizer helps to keep your nails healthy and hydrated, preventing them from becoming brittle or weak. A nail file or buffer is necessary to shape and smooth the repaired nail, ensuring a seamless finish. Cotton swabs or a small brush are useful for applying the glue precisely and removing any excess. Acetone or nail polish remover is essential for cleaning the nail surface before repair, removing any residue or oils that may interfere with the adhesive. Finally, lint-free wipes or paper towels are needed to clean up any spills or messes during the repair process.
Choosing the Right Acrylic Nail Glue
When it comes to choosing the right glue for fixing your acrylic nail, quality is key. Look for a glue specifically designed for acrylic nails that offers a strong bond and long-lasting hold. It’s important to choose a glue that is safe for use on nails and that dries clear for a seamless finish.
There are various brands and types of acrylic nail glue available in the market, each with its own unique features and benefits. Some glues are formulated to dry quickly, allowing for a faster repair process, while others offer a more flexible bond that can withstand everyday activities without lifting or breaking. It’s important to read reviews and do some research to find the glue that best suits your needs and preferences.
Additionally, consider the applicator of the glue. Some glues come with a brush applicator, which allows for precise and controlled application, while others have a nozzle or dropper for easy dispensing. Choose the applicator that you feel most comfortable using.
Remember, the quality of the glue you choose will directly impact the longevity of your repaired acrylic nail. Investing in a high-quality glue will ensure a strong bond that can withstand daily activities and prevent future mishaps.
Step-by-Step Guide to Fixing a Fallen Acrylic Nail
Now that you’re equipped with the necessary tools and materials, let’s dive into the step-by-step process of fixing a fallen acrylic nail.
Preparing Your Natural Nail
The first step is to ensure that your natural nail is clean and free from any old glue or debris. Start by soaking a cotton swab or small brush in acetone or nail polish remover and gently swipe it over your natural nail to remove any residue. Be sure to avoid getting acetone on the acrylic nail itself, as this can cause it to become cloudy or damaged.
Next, gently buff your natural nail using a nail file or buffer. This will help to create a rough surface, allowing the adhesive to adhere better. Be careful not to file too aggressively, as this can damage your natural nail.
Reattaching the Acrylic Nail
Now it’s time to reattach the fallen acrylic nail. Apply a small amount of nail glue or adhesive to the back of the acrylic nail, spreading it evenly over the entire surface. Carefully place the acrylic nail back onto your natural nail, ensuring that it lines up properly and sits flush against the nail bed.
Hold the acrylic nail in place for a few seconds to allow the glue to dry and set. Be careful not to apply too much pressure, as this can cause the glue to smudge or the acrylic nail to become misaligned.
Filing and Shaping the Nail
Once the glue has dried, use a nail file or buffer to shape and smooth the edges of the acrylic nail. Gently file the sides and tip of the nail, being careful not to file too much. This will help to blend the acrylic nail with your natural nail and create a seamless finish.
Finally, apply a small amount of cuticle oil or moisturizer to your cuticles and massage it in to keep them hydrated and healthy. This will also help to nourish your natural nails and promote their overall health.
Tips for Maintaining Acrylic Nails
Now that your acrylic nail is securely reattached, it’s important to follow some tips for maintaining them and preventing future damage or detachment.
Regular Nail Maintenance Tips
Regular maintenance is key to keeping your acrylic nails looking fresh and beautiful. Be sure to:
- Trim and shape your nails regularly to prevent them from becoming too long or prone to breakage.
- Moisturize your cuticles daily to keep them hydrated and prevent dryness or cracking.
- Avoid exposing your nails to harsh chemicals or products that can cause damage.
- Wear gloves when performing household chores or activities that may put your nails at risk of damage.
Avoiding Common Acrylic Nail Problems
When it comes to maintaining acrylic nails, prevention is key. Here are a few common problems to watch out for and how to avoid them:
- Loose or lifting nails: If you notice your acrylic nails becoming loose or lifting, do not attempt to fix them yourself. Visit a professional nail technician to have them repaired or replaced.
- Nail infections: Keep an eye out for signs of nail infections, such as redness, swelling, or pus around the nails. If you suspect an infection, seek professional help right away.
- Broken nails: If one of your acrylic nails breaks, avoid DIY repairs and visit a nail technician to ensure proper and safe repair.
When to Seek Professional Help
While many fallen acrylic nail issues can be fixed at home, there are certain situations where it’s best to seek professional help.
Signs of Nail Infection
If you notice any signs of a nail infection, such as redness, swelling, or discharge around your acrylic nail or the surrounding area, it’s important to seek professional help immediately. Nail infections should be treated promptly by a licensed nail technician or a healthcare professional to prevent further complications.
When DIY Repair Isn’t Enough
If you’ve followed the steps outlined above and your acrylic nail continues to fall off or feels loose, it’s time to consult a professional. A nail technician will be able to assess the situation and provide the necessary repairs or recommendations to ensure the health and longevity of your acrylic nails.
Fixing a fallen acrylic nail doesn’t have to be a daunting task. By understanding the causes of nail damage, practicing proper nail care, and following the steps outlined in this article, you’ll be well-equipped to fix your fallen acrylic nail and maintain the beauty and integrity of your nails. Remember, when in doubt, it’s always best to seek professional help to ensure safe and effective nail repairs.