Dab pens are a popular choice for cannabis enthusiasts who prefer a discreet and convenient way to consume concentrates. However, like any electronic device, dab pens can encounter issues. One common problem that users may face is broken wires. Fortunately, with a little bit of know-how and some basic tools, you can fix a dab pen with broken wires yourself. In this article, we will guide you through the process, step by step, ensuring that your dab pen is up and running again in no time.
Understanding the Anatomy of a Dab Pen
Before we dive into the specifics of fixing a dab pen, it’s important to understand its anatomy. A dab pen consists of several key components:
Key Components of a Dab Pen
The battery: This is the power source of the dab pen. It provides the necessary energy to heat up the concentrate and create vapor.
The atomizer: This is the heating element of the dab pen. It is responsible for vaporizing the concentrate and delivering it to the user.
The mouthpiece: This is the part of the dab pen that you inhale from. It is typically detachable for easy cleaning and maintenance.
Additionally, there are other important components that contribute to the overall functionality of a dab pen. These include:
- The chamber: This is where the concentrate is placed for vaporization. It is usually located near the atomizer and is designed to hold a small amount of concentrate.
- The airflow system: This system allows air to flow through the dab pen, ensuring proper vaporization and inhalation. It is important for a smooth and enjoyable vaping experience.
- The temperature control: Some dab pens come with temperature control features, allowing users to adjust the heat settings according to their preferences. This feature can enhance the flavor and intensity of the vapor produced.
- The charging port: Most dab pens are rechargeable and come with a charging port. This allows users to easily recharge the battery when it runs out of power.
How Broken Wires Affect Your Dab Pen
Broken wires can disrupt the flow of electricity within your dab pen. This can ultimately lead to the device not functioning as intended. The wires connecting the battery to the atomizer are crucial for the heating process. When these wires are damaged, the dab pen may not heat up properly, resulting in little to no vapor production.
Moreover, broken wires can also pose safety risks. If the wires are exposed or frayed, they can potentially cause a short circuit or even lead to a fire hazard. It is important to regularly inspect the wires and ensure they are in good condition to maintain the safety and performance of your dab pen.
When encountering broken wires in your dab pen, it is advisable to seek professional assistance or refer to the manufacturer’s instructions for repair. Attempting to fix the wires yourself without proper knowledge and skills may further damage the device or even cause harm to yourself.
Identifying the Problem
Before you can fix your dab pen, you’ll need to identify whether broken wires are indeed the issue. There are a few signs that can indicate broken wires:
When it comes to troubleshooting your dab pen, it’s important to know what signs to look out for. One of the most common indications of broken wires is a lack of vapor production. If you’re not getting any vapor when you try to use your pen, it’s a clear sign that something is amiss. Another sign to watch out for is inconsistent heating. If your pen heats up sporadically or doesn’t reach the desired temperature, broken wires could be to blame. Additionally, keep an eye out for intermittent LED lights on the battery. If the lights flicker or don’t turn on at all, it’s a strong indication that there may be broken wires within the pen.
Signs of Broken Wires in Your Dab Pen
- No vapor production
- Inconsistent heating
- Intermittent LED lights on the battery
If you experience any of these issues, it’s likely that broken wires are the culprit. However, it’s important to note that these signs alone may not provide a definitive diagnosis. To further confirm the diagnosis and ensure that broken wires are indeed the problem, you’ll need some basic tools:
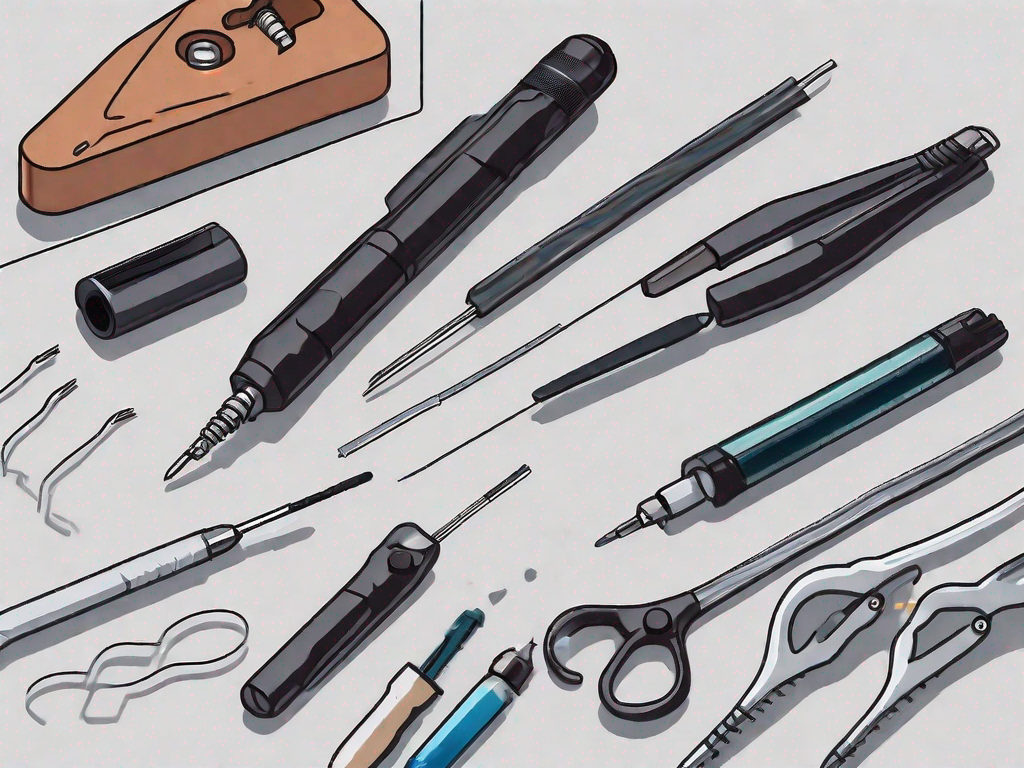
When it comes to diagnosing and repairing your dab pen, having the right tools is crucial. Without the proper equipment, it can be challenging to accurately identify and fix any issues. Here are a few essential tools that you’ll need:
Tools Needed for Diagnosis
- A multimeter to check for continuity: A multimeter is a versatile tool that can measure various electrical properties, including continuity. By using a multimeter, you can determine if there is a break in the wires of your dab pen.
- A soldering iron for repairs: If you do find broken wires, you’ll need a soldering iron to fix them. Soldering is the process of joining two metal components together using a heated soldering iron and a filler metal called solder.
- Wire cutters and strippers: To access and repair the broken wires, you’ll need wire cutters and strippers. These tools will allow you to remove the damaged section of wire and prepare it for soldering.
Having these tools on hand will not only help you diagnose the issue accurately but also enable you to make the necessary repairs effectively. Remember to exercise caution when working with electrical components and always follow proper safety procedures.
Preparing for the Repair
Now that you’ve confirmed broken wires are the cause of your dab pen’s issues, it’s time to prepare for the repair process. Before you begin, there are a few safety measures to consider:
Safety Measures to Consider
- Ensure that your dab pen is turned off and disconnected from any power source.
- Work in a well-ventilated area to avoid inhaling any fumes from the soldering process.
- Wear safety goggles and gloves to protect yourself from potential burns or injuries.
Once you’ve taken the necessary safety precautions, gather the following repair tools:
Gathering Your Repair Tools
- A soldering iron with a fine tip
- Flux and soldering wire
- Wire cutters and strippers
- A small screwdriver set
Now that you have your safety measures in place and your repair tools gathered, let’s delve into the detailed steps you’ll need to follow to successfully repair your dab pen.
First, find a clean and well-lit workspace where you can comfortably work on your dab pen. Clear any clutter and ensure you have enough space to maneuver the pen and your tools.
Next, carefully examine the broken wires in your dab pen. Identify the specific areas where the wires are damaged or disconnected. Take note of any other components that may have been affected by the broken wires.
Before you proceed with the repair, it’s essential to have a clear understanding of the wiring diagram for your dab pen. Refer to the manufacturer’s manual or search online for a detailed schematic diagram. Familiarize yourself with the different wire connections and their corresponding components.
Now, it’s time to start the repair process. Begin by heating up your soldering iron. Ensure that the temperature is set to an appropriate level for the type of wires and components you’ll be working with. Wait for the soldering iron to reach the desired temperature.
While waiting for the soldering iron to heat up, prepare the wires for soldering. Use the wire cutters to trim any frayed or damaged ends. Then, use the wire strippers to remove a small section of insulation from the ends of the wires, exposing the bare metal.
Apply a small amount of flux to the exposed metal ends of the wires. Flux helps to clean the metal surface and promotes better soldering. Make sure to apply the flux evenly and sparingly.
Now, take the soldering wire and melt a small amount onto the tip of the soldering iron. This process is called “tinning” and helps to transfer heat efficiently during the soldering process. Ensure that the soldering wire adheres evenly to the tip of the soldering iron.
With the soldering iron ready, carefully position the wires in their correct locations according to the wiring diagram. Hold the soldering iron against the exposed metal ends of the wires and apply gentle pressure. Allow the heat to melt the soldering wire, creating a secure bond between the wires and the components.
Once the solder has cooled and solidified, inspect the solder joints to ensure they are clean and free from any excess solder or flux residue. Use a small brush or a cotton swab dipped in isopropyl alcohol to clean any residue if necessary.
Repeat the soldering process for each broken wire or disconnected connection in your dab pen. Take your time and work methodically to ensure each repair is done correctly.
After completing the soldering repairs, carefully reassemble your dab pen, ensuring that all components are securely in place. Double-check all wire connections to make sure they are properly soldered and insulated.
Finally, once you’ve reassembled your dab pen, it’s time to test it. Connect it to a power source and turn it on. Check if the issues you were experiencing before the repair have been resolved. If everything is functioning correctly, congratulations! You’ve successfully repaired your dab pen.
Remember, it’s always a good idea to practice proper maintenance and care for your dab pen to prevent future issues. Regularly inspect the wires and connections, and address any signs of wear or damage promptly.
With these detailed steps and safety measures in mind, you can confidently repair your dab pen and enjoy uninterrupted vaping sessions.
Step-by-Step Guide to Fixing Broken Wires
With your repair tools at hand, you’re ready to fix your dab pen’s broken wires. Follow these steps carefully:
Removing the Broken Wires
- Start by disassembling your dab pen. Unscrew the battery and carefully remove the atomizer.
- Identify the damaged wires. They may appear frayed, disconnected, or burnt.
- Using wire cutters, carefully cut the damaged wires, ensuring that you leave enough length to work with.
- Strip the ends of the remaining wires using wire strippers. This will expose the copper wire underneath.
Installing the New Wires
- Take the new wires and strip the ends using wire strippers.
- Apply a small amount of flux to the stripped ends of both the new wires and the existing wires.
- Using the soldering iron, carefully heat the fluxed ends and join them together. Make sure the connections are secure and soldered properly.
- Allow the connections to cool down before proceeding.
Testing Your Repaired Dab Pen
Now that you’ve successfully repaired your dab pen’s broken wires, it’s time to test it and ensure everything is functioning as expected. Here’s how you can do it:
How to Know If Your Repair Was Successful
- Reassemble your dab pen by screwing the atomizer back onto the battery.
- Turn on your dab pen and wait for it to heat up.
- Check for consistent vapor production and proper heating. If everything is working smoothly, congratulations! Your repair was successful.
Troubleshooting Post-Repair Issues
If you encounter any issues after repairing your dab pen, there are a few troubleshooting steps you can take:
- Double-check the connections to ensure they are secure and properly soldered.
- Inspect the wires for any signs of damage or loose connections.
- If necessary, repeat the repair process, paying close attention to the soldering technique.
- If the issues persist, it may be time to consult the manufacturer or seek professional assistance.
Fixing a dab pen with broken wires is a manageable task that can save you time and money. By following this step-by-step guide and using the appropriate tools, you’ll be able to enjoy your dab pen again in no time. Remember to exercise caution and take all necessary safety precautions throughout the repair process. Happy dabbing!
Leave a Reply