Birkenstock sandals are known for their comfort and durability. However, over time, the straps may wear out or become damaged. But fear not! With a few simple tools and some basic repair know-how, you can easily fix your Birkenstock strap and extend the life of your favorite sandals. In this article, we’ll guide you through the process step by step, from understanding the anatomy of a Birkenstock strap to attaching a new one. So grab your tools and let’s get started!
Understanding the Anatomy of a Birkenstock Strap
Before we dive into the repair process, it’s important to familiarize yourself with the different parts of a Birkenstock strap. This will help you identify any issues and understand how the strap works.
When you take a closer look at a Birkenstock strap, you’ll realize that it’s not just a simple piece of leather or fabric. It consists of several components that work together to provide comfort and support for your feet.
Identifying Different Parts of the Strap
Let’s break down the different parts of a Birkenstock strap:
- The upper strap: This is the main part of the strap that loops around your foot. It is designed to securely hold your foot in place while allowing for natural movement.
- The buckle: Located on one end of the strap, the buckle is used to adjust the tightness of the strap. It ensures a customized fit and prevents the sandal from slipping off your foot.
- The loop: A small loop near the buckle that holds the excess strap in place. This feature helps to keep the strap neat and prevents it from flapping around while you walk.
- The attachment points: These are the areas where the strap is connected to the sole of the sandal. They are reinforced to ensure durability and stability.
Each of these components plays a crucial role in the overall functionality of the Birkenstock strap. Understanding their purpose will enable you to better assess any issues that may arise and make informed decisions when it comes to repairs or replacements.
Materials Used in Birkenstock Straps
Birkenstock straps are crafted using high-quality materials to ensure both comfort and longevity. The choice of material can vary depending on the specific model and style of the sandal.
One common material used for Birkenstock straps is leather. Leather straps are known for their softness, flexibility, and ability to mold to the shape of your foot over time. This ensures a personalized fit and enhances the overall comfort of the sandal. Additionally, leather straps often develop a beautiful patina with age, adding character to your Birkenstocks.
For those seeking a more affordable option or a sandal that can withstand water exposure, Birkenstock also offers straps made from durable synthetic materials. These synthetic straps are often water-resistant, making them ideal for outdoor activities or beach trips. They are designed to withstand wear and tear, ensuring that your Birkenstocks remain in good condition for a long time.
Whether you prefer the classic elegance of leather or the practicality of synthetic materials, Birkenstock straps are carefully crafted to provide both style and functionality. The choice of material ultimately depends on your personal preferences and the specific needs of your lifestyle.
Common Issues with Birkenstock Straps
Now that you know the basics, let’s take a look at some common issues you may encounter with your Birkenstock straps.
Wear and Tear Over Time
With regular use, it’s natural for Birkenstock straps to show signs of wear and tear. The constant bending and flexing of the straps can cause them to weaken or even break. Additionally, exposure to water, sweat, and other elements can accelerate the deterioration process.
One of the most common signs of wear and tear is fraying. Over time, the edges of the straps may start to fray, giving them a worn-out appearance. This can happen due to the friction caused by the straps rubbing against each other or against other surfaces. The fraying can also be more pronounced in areas where the straps are frequently adjusted or pulled tightly.
Another issue that may arise is stretching. As the straps are repeatedly stretched and tightened, they may lose their original shape and become looser. This can result in a less secure fit and may require frequent adjustments to keep the sandals in place.
Strap Detachment
Another issue you may face is the strap detaching from the sole of the sandal. This can happen if the attachment points become loose or if the stitching holding the strap in place unravels.
One possible cause of strap detachment is excessive strain. If the straps are pulled too tightly or if they are subjected to sudden and forceful movements, the stress on the attachment points can cause them to give way. This is more likely to occur if the sandals are worn during activities that involve a lot of movement, such as running or hiking.
In some cases, the strap detachment may be due to a manufacturing defect. If the stitching or the attachment points were not properly reinforced during the production process, they may fail prematurely, leading to strap detachment.
Buckle Problems
The buckle is an integral part of the Birkenstock strap, and if it becomes damaged or malfunctions, it can render the strap unusable. Common buckle problems include jamming, breakage, or the loop failing to hold the excess strap securely.
Jamming is a common issue that can occur when dirt, sand, or other debris gets trapped inside the buckle mechanism. This can prevent the buckle from properly engaging or disengaging, making it difficult to adjust the strap or remove the sandals. Regular cleaning and maintenance can help prevent jamming and ensure smooth operation of the buckle.
Breakage of the buckle can happen if it is subjected to excessive force or if it is made of low-quality materials. The constant bending and pressure applied to the buckle during strap adjustments can weaken it over time, eventually leading to breakage. Investing in sandals with high-quality buckles can help minimize the risk of this issue.
Another problem that may occur is the loop failing to hold the excess strap securely. This can result in the strap coming loose during movement, causing discomfort and potential tripping hazards. Regularly checking the loop for any signs of wear or damage can help prevent this issue and ensure a secure fit.
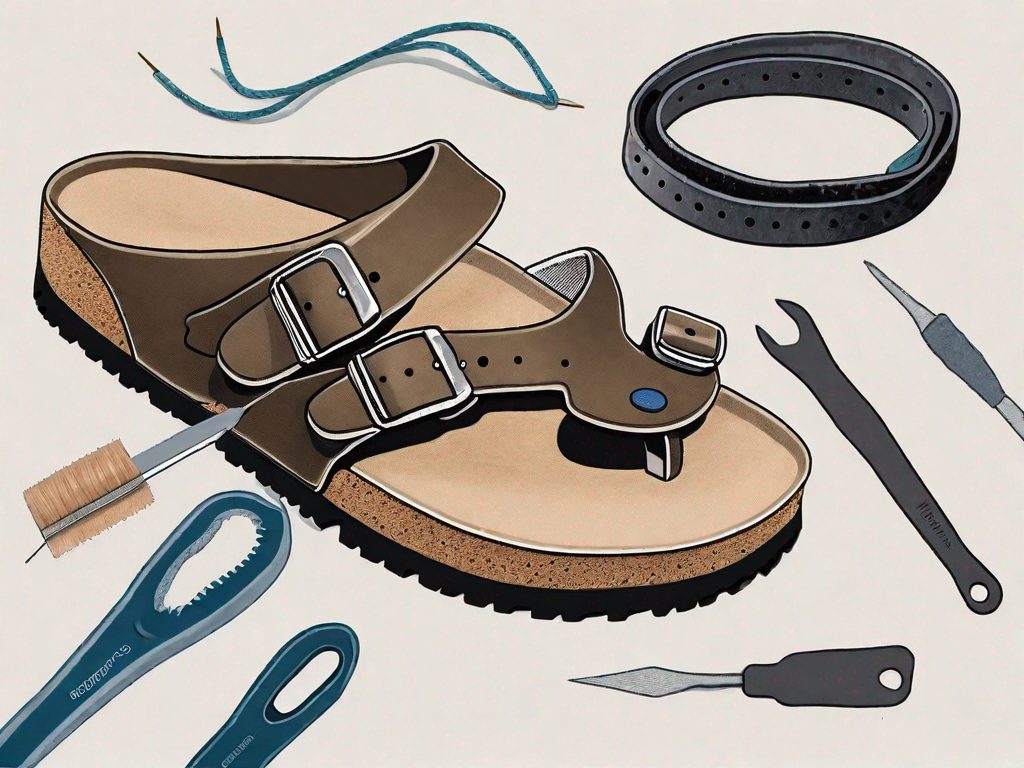
Tools Needed for Birkenstock Strap Repair
Before you start repairing your Birkenstock strap, make sure you have the necessary tools at hand.
Repairing Birkenstock straps can be a simple and cost-effective way to extend the life of your beloved sandals. Whether you’re dealing with a torn strap or a loose buckle, having the right tools will make the repair process easier and more efficient.
Basic Household Tools
For most strap repairs, you’ll need the following:
- A small flathead screwdriver: This versatile tool will come in handy for removing any screws or fasteners that may be holding the strap in place.
- A pair of scissors: You’ll need these to trim any excess material or to cut a new strap to the desired length.
- A needle and thread or a sewing machine: Depending on the type of repair needed, you may need to sew the strap back together or attach a new strap using a sewing machine.
- A ruler or measuring tape: Accurate measurements are crucial when it comes to repairing Birkenstock straps. A ruler or measuring tape will help ensure that your new strap is the perfect fit.
- Some sandpaper: If your Birkenstock strap has rough edges or frayed ends, sandpaper can be used to smooth them out, giving your repaired strap a polished look.
Specialized Repair Tools
In certain cases, you may need additional tools specific to Birkenstock straps. These can include:
- An awl or leather punch: These tools are useful for creating new holes in the strap or enlarging existing ones. They can also be used to add decorative stitching to the strap.
- A strap cutter: If you need to replace the entire strap, a strap cutter will help you remove the old strap quickly and cleanly.
- A strap-stitching awl: This specialized tool is designed to make stitching through thick leather or fabric easier. It can be particularly useful when repairing Birkenstock straps with multiple layers or intricate designs.
Having these tools readily available will save you time and frustration when it comes to repairing your Birkenstock straps. With a little patience and the right tools, you’ll be able to restore your favorite sandals to their former glory and continue enjoying the comfort and style they provide.
Step-by-Step Guide to Fixing a Birkenstock Strap
Preparing Your Work Area
Before you start repairing the strap, find a clean, well-lit workspace where you can comfortably lay out your tools and materials. This will ensure that you have enough space to work and prevent any unnecessary accidents.
Set up a table or workbench with enough room to spread out your tools and materials. Make sure the area is well-ventilated and free from any distractions that could hinder your focus.
Gather all the necessary tools and materials for the repair, such as scissors, replacement straps, a seam ripper or small scissors, a small flathead screwdriver or awl, and a new buckle if needed.
Having everything organized and within reach will make the repair process smoother and more efficient.
Removing the Damaged Strap
The first step in fixing a Birkenstock strap is removing the damaged portion. Use your scissors to carefully cut away any frayed or broken sections of the strap. Be sure to trim the strap close to the attachment points, but avoid cutting too much and compromising the integrity of the sandal.
Inspect the strap thoroughly to identify the extent of the damage. Look for any loose threads, tears, or weak spots that may need to be addressed during the repair process.
If the strap is attached with stitches, use a seam ripper or small scissors to carefully remove the stitches and detach the strap from the attachment points. Take your time to avoid damaging the sandal or any other components.
Once the damaged strap is removed, clean the area around the attachment points to ensure a smooth and secure fit for the new strap.
Attaching the New Strap
Now it’s time to attach the new strap. If you’re using a pre-made replacement strap, align it with the attachment points and insert the ends into the holes. If necessary, use a small flathead screwdriver or awl to help guide the strap through the holes.
Make sure the new strap is the correct length and width to match the original strap. This will ensure a proper fit and maintain the comfort and functionality of the sandal.
If you’re making your own strap, measure the length needed, and cut a piece of leather or synthetic material accordingly. Remember to leave some extra length for adjustments. Use a leather punch or a sharp object to create evenly spaced holes along the edges of the strap for attachment.
Once the new strap is aligned and inserted into the attachment points, double-check that it is securely fastened and able to withstand regular use. Tug on the strap gently to test its strength and stability.
Securing the Buckle
The final step is securing the buckle. If the original buckle is still in good condition, you can reattach it to the new strap. Insert the excess strap through the loop and adjust the tightness to your liking. Trim any excess strap if necessary.
Inspect the original buckle for any signs of wear or damage. If it shows signs of weakness, it’s best to replace it with a new buckle to ensure the longevity of the repair.
If the buckle needs to be replaced, carefully remove the old one and attach the new buckle according to the manufacturer’s instructions. Make sure it is securely fastened and able to hold the strap in place.
Once the buckle is attached, adjust the strap to your desired tightness and comfort. Ensure that it is not too loose or too tight, as this can affect the overall fit and feel of the sandal.
And there you have it! You’ve successfully fixed your Birkenstock strap and can now enjoy your favorite sandals for even longer. Remember, regular maintenance and timely repairs can help prolong the life of your sandals, so don’t hesitate to take care of any issues as soon as they arise. Happy strapping!
With your newly repaired Birkenstock strap, you can confidently step out in style and comfort. Whether you’re strolling along the beach or running errands in town, your sandals will provide the support and durability you need.
It’s important to note that proper care and maintenance are essential to keep your Birkenstock sandals in top condition. Regularly clean them with a damp cloth and mild soap, and avoid exposing them to extreme heat or harsh chemicals.
Additionally, consider investing in a shoe repair kit that includes replacement straps, buckles, and other essential components. This way, you’ll always be prepared to fix any future strap issues without delay.
By taking the time to repair your Birkenstock strap, you’re not only saving money but also reducing waste and contributing to a more sustainable lifestyle. So, embrace your DIY skills and enjoy the satisfaction of giving your beloved sandals a new lease on life!